Tuesday, October 23, 2012

For your Halloween Safety: Roasted Garlic Cauliflower Soup

Oh EM Goodness!

I saw this recipe pop up on my reader and I knew it was in my future. I happened to have some cream in my fridge with which to make it. YUM!

Beware: there are 3 heads of roasted garlic (no, that wasn't a typo- 3 heads of roasted garlic!) Luckily for me I have no boyfriend, so I won't be doing any kissing...


Cauliflower and Roasted Garlic Soup
by Oven Love, via Martha Stewart Recipesserves 10-12
This recipe is for a crowd (think holidays)- but can be easily halved and it's freezable, too.
Ingredients

  • 3 heads garlic
  • salt and pepper
  • 1/2 cup extra-virgin olive oil, plus more for drizzling
  • 3 white onions, peeled and thinly sliced
  • 4 heads cauliflower, 3 cored and thinly sliced and 1 broken into florets
  • 8 sprigs thyme, tied with twine, plus one tablespoon chopped (you can sub. 1T dried thyme)
  • 1 cup dry white wine
  • 6 cups chicken stock, plus more to thin, if desired
  • 2 cups heavy cream, plus more to thin, if desired
  • 2 1/2 cups plus 3 tablespoons grated Parmesan cheese (I just used 1 1/2 cups, what was in the bag)
  • 2 tablespoons chopped parsley (and I didn't have any of this)
Directions

1. Preheat oven to 325 degrees. Cut off the tops of garlic heads. Place each on a piece of aluminum foil. Sprinkle with salt and pepper and drizzle with olive oil. Wrap tightly in foil, and bake until garlic is very soft, about an hour. Let cool. Squeeze garlic from peel; set aside. Increase oven to 350 degrees.

2. Heat 1/4 cup olive oil in a large pot over medium low heat. Add onions and season with salt and pepper. Cook, stirring, until soft but not browned. Stir in sliced cauliflower, thyme and wine. Simmer until wine is reduced by half. Add stock, bring to a simmer. Cover and cook for 20 minutes. Remove cover and simmer until cauliflower is soft, about 15 minutes more. Remove from the heat.

3. Remove thyme bundle and stir in cream and 2 1/2 cups Parmesan. Season with salt and pepper. Stir in garlic. Puree with a stick blender or in batches until smooth (One reason a stick blender is on my Christmas list!). Thin with more stock or cream, if desired. Return to pot; keep warm on low heat.

4. Heat remaining 1/4 cup olive oil over high heat in a saute pan until almost smoking. Add cauliflower florets, stirring until browned. Season with salt and pepper. Transfer pan to oven and cook until tender, about 10 minutes. (DON'T GRAB THE PAN HANDLE WITH YOUR BARE HAND! OUCH!)  Stir in thyme, parsley and remaining 3 tablespoons Parmesan. To serve; ladle soup into bowls and garnish with cauliflower florets.

I'll update with pictures later, but oh my YUM!

Friday, October 19, 2012

Heaven in a paper liner: Triple Chocolate Cupcakes.

Let's talk about the look in my eyes. What caused that?
Photo: Magical! 

Maybe I've been single too long. 
Maybe Grad school has made me crazy.
Maybe since I only ever hang out with girls (there are only 2 guys in my program, one married, one engaged)
Maybe it's because there is no cocoa bean, no sweet tooth fairy, no sprinkles, no creme de la creme. There's just me and my oven that cooks 25* hot... 

But I think the look in my eyes is because that cupcake I'm gazing at lovingly is likely the best thing that has passed through my lips since daddy took me to Brio, and even that's comparing apples and oranges. 

I shared these with people in my program, the local sister missionaries, and all of my professors... who has brownie cupcake points. This girl!!

Direct quotes:
"Zimmerman, I've had cupcakes from big fancy cupcake places, including Sprinkle's cupcakes, yours could stand up to any of them" -Wilkerson (who I later found out is diabetic... oops!)
"I tried to steal Wilkerson's before he realized what he had been given"- Wendy, the dept secretary
"I don't even like chocolate cake and that was the best cupcake I have ever eaten"-- Swift, department head

A real conversation:
Me, bearing cupcakes: "Happy International Chocolate Cupcake Day!"
Swift: "Ohh, we like Zimmerman."
Weems (graduate school dean): "But we didn't realize how much till just now"

So yeah. These are AMAZING. AND! I can't find the link for the recipe!! But! Never fear. In order to make them without getting my computer dirty, I wrote out the recipe! Unfortunately it means I can't site my source. But whoever you are. My mouth (and half of the population of Portales) thanks you!

Without Further Ado:

Milk Chocolate Cupcakes:

2/3 cup butter
1 3/4 cup brown sugar
3 eggs
1/4 c sour cream
1 cup milk (I forgot to put this in the recipe and when I was making these for to impress someone I couldn't figure out why the batter was so darn thick!) 
1 1/4 c cocoa powder
1 1/4 c flour
3/4 tsp. baking powder
1/4 tsp salt
1/4 tsp baking soda

Cream butter and brown sugar, add eggs and sour cream, and milk; mix till smooth. Add dry ingredients and mix till just combined. 
Fill 24 lined cupcake tins. (I know sizes/how full you like them varries, I ended up with 24 cupcakes and glass ramekins filled with deliciousness). 
Bake at 350* for 17-19 minutes. I've quit poking my cupcakes to check for doneness, I just tap the tops, if they stay depressed, not quite done. If they spring back up, perfect! 
Let the cupcakes cool COMPLETELY. (I made them before I went to institute for an hour and a half or so. They were cool when I got home)

Dark Chocolate Ganache Filling
(yup, you read that right. Don't let that Ganache word scare you-- it's easy peasy!)

1 1/2 cups dark chocolate chips
1 cup heavy cream 
1 t vanilla

Mix all in a microwaveable bowl. Heat in microwave for about a minute on medium-high power, then mix it until it is smooth. At this point I let it sit for a few minutes to thicken to make it easier to work with. 

See what I mean! Easy. 
CHECK OUT THAT GANACHE! MMMMMMM. And also the cake texture. Perfect!

White Chocolate Butter-cream Frosting

Look close at the frosting! It's PERFECT. Light. Airy. Delicious!

1 cup white chocolate chips
2 sticks (1 cup) butter at room temp
6 cups powdered sugar
1 Tbsp Vanilla
2-4 Tbsp milk

Melt chips completely in microwave. (Heat on 50% power for a minute, stir. If not melted, put back in the microwave for 30 second increments on 50% power). 
Beat the white chocolate chips in with the butter till nice and creamy. 
Add powdered sugar and vanilla.
Slowly add just enough milk to get the right consistency. 

Assembly:

Take a serrated knife and cut a hole in the tops of the cupcakes (for me this wasn't a precise science, I just tried to make a hole that would allow enough ganache to make it worth while, you know?) Some bakers put tops over their filling, but why? It's going to be covered in frosting anyway... Use the tops for... snacking? Cakeballs? Feeding the ducks? 

Spoon the slightly thickened ganache into the hole made in your cupcake. 

You can always frost with a knife, but I like easy... so I put the frosting in a disposable piping bag, cut the tip off of it and piped an easy swirl on top of all 27 cupcakes! 

I put on chocolate sprinkles just for fun. 

Use these cupcakes to win friends and influence people. 

Or as a substitute for a love life... who needs men when you can have cupcakes.... (oh dear, but seriously)


Photo: Magical!


Also, for easy transportation/mess fee use short clear Dixie cups. They're perfect size! You could even cover them, if you are ambitious. 

Monday, October 8, 2012

Crock Pot Crazy Part 2: White Chicken Chili

On Friday night, the sister missionaries called me and asked if I was willing to make lunch for General Conference at the church between sessions on Sunday. I knew what I wanted to make! I've had this recipe in various permutations, and this one was pretty delicious. 


White Chicken Chili


2 pound boneless, skinless chicken breasts 
2 med onion chopped 
3 tsp garlic powder or 4 cloves fresh garlic minced
4 cans great northern beans, rinsed and drained
24 oz chicken broth
4-6 cans chopped green chilies
2-4 tsp salt
2 tsp cumin
2 tsp dried oregano
1 tsp pepper
1/4-1/2 tsp cayenne pepper
2 cup sour cream
1 cup whipping cream
1 cup shredded pepper jack cheese 

In a slow cooker (mine is 7 quarts) place chicken breasts (fresh or frozen) add chopped onion, garlic, beans, green chilies  chicken broth and all spices. Do not add sour cream or whipping cream. Stir the mixture around a bit to incorporate dry spices. Cook on low for 5-7 hours. Remove chicken to cutting board and shred into bite size pieces. Stir back into slow cooker. In small bowl whisk together sour cream and whipping cream until smooth. Whisk the cream mixture into the crock pot with other ingredients. Let the soup cook until heated through. Right before serving stir in shredded cheese. 

This is YUMMY (Probably partially because of the cream, let's be honest here). But it was great! I stuck it in the crock pot, went and watched the morning session, shredded the chicken, added the cream, and Yum! Everyone asked for the recipe. 

Crock Pot Crazy Part One: Vegetable and Chickpea Curry

With my life being crazy busy these days (grad school is ROUGH), I've been looking for ways to eat delicious food, be healthy, and not spend 5 million hours in the kitchen. This weekend, I spent two days using my beautiful crock pot to fill my fridge/freezer with delicious food for this coming week, as well as taking one pot of it to the church during General Conference.


Ingredients

  • 1 tablespoon olive oil
  • 1 1/2 cups chopped onion 
  • 1 cup (1/4-inch-thick) slices carrot
  • 1 tablespoon curry powder
  • 1 teaspoon brown sugar
  • 1 teaspoon grated peeled fresh ginger
  • garlic cloves, minced
  • serrano chile, seeded and minced (Walmart in Portales didn't have these... I got a jalapeno instead)
  • 3 cups cooked chickpeas (garbanzo beans) (I used 2 cans)
  • 1 1/2 cups cubed peeled baking potato 
  • 1 cup diced green bell pepper 
  • 1 cup (1-inch) cut green beans
  • 1/2 teaspoon salt
  • 1/4 teaspoon black pepper
  • 1/8 teaspoon ground red pepper
  • (14.5-ounce) can diced tomatoes, undrained 
  • (14-ounce) can vegetable broth
  • 3 cups fresh baby spinach 
  • 1 cup light coconut milk 
  • Lemon wedged (I didn't do this... I forgot to buy one.)

Preparation

  1. Heat oil in a large nonstick skillet over medium heat. Add onion and carrot; cover and cook 5 minutes or until tender. Add curry powder, sugar, ginger, garlic, and chile; cook 1 minute, stirring constantly.
  2. Place onion mixture in a 5-quart electric slow cooker. Stir in chickpeas and next 8 ingredients (through broth). Cover and cook on HIGH 6 hours or until vegetables are tender. Add spinach and coconut milk; stir until spinach wilts. Serve with lemon wedges.

Wednesday, August 22, 2012

Toddler approved meals

I have a lovely toddler who is not into eating a lot of vegetables. As of late I have decided to try and find ways to get her to eat her veggies without her even realizing it. This recipe portions and freezes well for make ahead meals (which is great for me since baby #2 is almost here and cooking meals will be out the window soon), and it is pretty delish even for adults.


Broccoli and Spinach Pasta
1 TBL butter
1 TBL flour
1 cup milk (for a lighter sauce, use skim)
1/2 cup grated cheese
Salt & Pepper to taste
Cooked pasta of choice, about1 cup uncooked (I recommend wheat or fortified pasta)
Vegetables of choice, chopped finely

Melt butter and stir in flour. Once it is smooth slowly add in the milk, using a whisk to get rid of any chunks. Bring to a light boil so that it thickens. Reduce heat, add in cheese, salt and pepper, and voila! Sauce is ready.
Add in vegetables of choice to your sauce and keep on low heat so they get soft. **If you are doing a lot of hard vegetables like carrots, broccoli, cauliflower, etc I would recommend steaming them quickly in the microwave beforehand to save time.**
Add in cooked pasta and you're ready to go. With the extra pasta (if there is any) divide it into plastic bags portioned for your toddler and freeze. It reheats in about 1 min, stir after 30 seconds.


The nice thing about this recipe is that it is simple, completely flexible, and healthy! I know that the makers of baby/toddler foods have the best intentions, but this is preservative free and way cheaper than buying pre-made food.

Wednesday, August 8, 2012

Party Planning


This is an ode to my mother who may be the best party thrower ever! Here are some preliminary tips on party planning...

The beginning stages

  1. Pick a theme. My mom is already planning, purchasing, and scheduling her Halloween Party. She has been in the works for quite some time, I'd say a good six months. Not all parties need this much advanced planning, but hers does. The theme this year is like an Old Hollywood/ celebrity theme. Once the theme is narrowed down it makes it super easy to start collecting decorations, invites, etc. 
  2. Start Collecting. Nothing is worse than falling in love with the last xyz at a store, then to find out that it can't be ordered in time. For Julia's birthday party I found the cutest little gift boxes at a garage sale in April as well as themed cupcake decorations at a post-Easter sale. If I had waited until June to get these things I probably would not have found what I was looking for or I would have had to of settled for the next best thing. I also purchased all of the table clothes, cups, plates, decorations a month in advance just to make sure we had it all and I didn't have to stress last minute. Seasonal items also tend to be available in greater supply months before the actual holiday.
  3. Make your guest list. Even having a tentative idea in your mind of how many people are coming will help with small last minute details. Try and send out a Save The Date card, text, FB invite, etc so that people have plenty of time to get work off so they can be there. This is especially important at catered events, like our Halloween Birthday party 2 years ago, or say, a wedding...
  4. Make a tentative menu. Start collecting recipes, advice, ideas, etc to help make food planning and preparation a breeze. I had my menu made about a month in advance for Jackson's baby shower and I was able to tweak it accordingly. I didn't have to stress about food...one less thing.
I will stop here. These are the first 4 steps to a great party, but trust me there are more to come.

Friday, July 27, 2012

Baby Shower Crafts

For my baby shower  I was on a tight budget so  I decided to make some of the decorations for the party. First we have a customized banner showcasing Jackson's name. 


First cut a 12x12 piece of scrapbooking paper or cardstock into a 6x12. From the top make a mark at 6" and from the bottom make marks at the 3" and 9" mark. Cut from the top down to your 3" mark, up to the top to your 6" mark, then back down to your 9" mark and finally up to your top end. This will give you a total of 6 flags per 12x12 sheet.

For the letters I used a cricut to cut them, however, if you do not have one you can always use a marker to draw them in, or print letters out using your computer and cut them out by hand. 

To attach the flags together I used some neutral ribbon and stapled each flag on, using 3 staples per flag to secure it. I have also seen people sew the paper across the tops to make the banner, that works, too.


We also made tie and bowtie onesies. The first step is to wash, dry, and iron your onesies and the fabric you intend on using for them. I free-handed my pattern for the tie by drawing it onto computer paper, cutting it out, and making sure it was even. 
Attach the pattern onto the fabric using a couple of pins. Then cut it out. We used fabric glue to attach them (careful! the glue can run through to the back so make sure you put a piece of cardboard inside the onesie) and to finish them you just embroider around the edges, like so:

Lastly, I made this cute little stand for Jackson's scrapbook. It was accompanied by little cards that everyone could write notes on for him that I will later put in said scrapbook.

I used a 6x6 piece of scrapbook paper as my base. Then I used solid pieces of cardstock to frame out his name, instructions, and the ultrasound photo. The "Coming Soon" I cut out with a cricut, but if you don't have one you can always use stickers or print out the letters from your computer and cut them out by hand. 


Thursday, July 12, 2012

Tomatoes 3 ways, part 3

Finally, part 3, and this is an easy one!

Texas (or Cowboy) caviar

5 tomatoes, seeded and diced
1 jalepeno, seeded, veined, and finely diced
1 bell pepper, seeded and diced
1 can corn, drained
1 can beans (black or pinto), drained
2 small avocados, diced
1 lime, juiced
2 TBS olive oil
Ground red pepper, add as preferred.

Add all chopped ingredients into a large bowl. Mix the lime juice, olive oil, and red pepper in a small bowl and pour over the chopped ingredients. Mix gently (the avocado will loosen up a lot if you over mix it) and enjoy!

Wednesday, June 20, 2012

Tomatoes 3 ways, part 2

This is one of Brenan's favorite things that I make. ever. We can literally eat an entire bowl in one sitting.

Pico de Gallo

5 tomatoes, seeded, diced
1 bell pepper, seeded, diced
1/4 - 1/2 (depending on size) white onion, diced
1 jalapeno seeded, de-veined, diced (if you like heat, keep in the seeds/veins)
Juice of 1/2 - 1 lime, depending on size, juiciness, and preference
2 Tablespoons salt  (sounds like a lot? Not really. It brings out all of the flavors and enhances everything magnificently)
1 teaspoon garlic powder
cilantro (optional, we don't use it...)

Chop everything, mix, and enjoy! I recommend adding the onions last so you don't cry. Also, add half of your salt and lime juice,  then do a taste test. It is always easier to add more, but if you overdo it you're stuck with a strong pico.

Thursday, June 14, 2012

Tomatoes three ways: Part 1

Recently my mom gave me a ton of tomatoes, like more than one person could use in a month...So, I decided to be creative and get cooking so that they didn't go bad, plus it's good practice since I have tomato plants growing in my garden.

Fresh pasta sauce

Ingredients
8-9 vine ripened tomatoes (or slicing tomatoes)
3 TBS olive oil
2 TBS minced garlic
1 TBS Italian seasoning
2 TBS salt
1/4 cup chopped onion
1/4 tsp pepper
**optional** basil and red pepper flakes

Roughly chop up your tomatoes. I threw out most of the "guts" i.e. seeds and insides, but I reserved some just in case my sauce got too dry.
The guts

Put your tomatoes in a pot on medium heat (with your olive oil) to cook them down. As they cook down the tomatoes will peel themselves and you can pick out the skins if you don't like them. Add all of your seasonings and continue to let the tomatoes render out, about 20 min.


After 20 min turn your heat down to lo/simmer and if your tomatoes start to get too dry, add in some of the guts that you didn't throw out. After about 15 more minutes, take out 2/3 of your tomatoes and puree them in a food processor/blender/magic bullet. I did a rough puree, dumped 1/2 back in, then finely pureed the rest. I like texture in my sauce, but if you do not, then puree all of the tomatoes until fine.

This was enough sauce to cover about 1/2 lb of cooked pasta, to which I also added 2 chicken breasts.


Chicken Breast Secret

 Heat your oven to 350. In a pan on the stove (medium heat) add a little oil before adding your chicken breasts and then sear your chicken for about 2 min on each side, giving them a nice golden brown color. Transfer them to your oven for about 10-15 min (depending on their thickness) and you have a perfect chicken breast that didn't dry out on the stove!


Thursday, May 17, 2012

Gardening Tips

So, I have only killed one plant thus far. Here are some things that I have learned along the way:
  1. Read plant labels. Some plants needs lots of sun and water, and other do not. Putting plants that need a lot of water next to plants that need less water was not my smartest move. However, everything is still alive, I just have to be extra careful how much I water everything.
  2. Be nice to your hose. Once it gets a kink in it, even if you undo it, it will always have that crease and want to re-kink. It's annoying and can definitely be avoided. 
  3. If you don't know what you're doing, try two things: ask someone what to do or buy miracle grow. Both have seemed to work for me.
  4. Shop around for gardening supplies. There is no need to pay top dollar at a store just because you are there. Check ads and sales to save some money on your garden. My dad asked, "why don't you just buy a tomato plant?" I replied, "Because this (growing my own starters) cost me twenty cents and I got five tomato plants out of it."
  5. Ask people in your area about how things grow in that local vicinity. I happen to be at a Relief Society activity where we started talking about gardening and the women gave great tips and advice.
 Here is my garden's progress.
This is the full view of the flower area. All of the flowers in bloom I bought that way and the green sprouts to the left I planted (about a month ago).The idea is to have short plants in the front and tall wildflowers in the back.
These guys in the center are the wildflowers that I planted about a month ago. I hope they make it to a full bloom!
These are the wildflowers I planted about two weeks ago. They are about 1/2" tall

Last but not least, my tomato starters. I think my last photo showed them to be about an inch, and they have quickly grown. Plus, there are 5 of the 6 that sprouted which is nice.I have been watering them daily, keeping them in the window sill, and I gave them some miracle grow tomato feed.


Thursday, May 3, 2012

Monday, April 30, 2012

Sweet Potato and Chicken Risotto

Are you ready to love me? THIS STUFF IS HEAVEN.  My dad took me out to Brio last week and I was super sad because at $20/plate there is no way I can justify ever going there on my own. But making it on my own... YES! Check out the video and be prepared to LOVE me (or the chef who made this deliciousness.)

Chicken sweet potato risotto at Brio Tuscan Grille.  Manuel Martinez/Staff
Sweet Potato and Chicken Risotto
Ingredients

2 ounces olive oil
4 ounces pancetta
12 ounces sweet potatoes, roasted (recipe below)
8 ounces asparagus, grilled, cut on a diagonal
24 ounces chicken stock (may be purchased)
24 ounces risotto, cooked (recipe below)
12 ounces pulled oven-roasted chicken (I got a rotisserie chicken)
4 tablespoons unsalted butter
8 tablespoons Reggiano or Parmesan cheese, shredded
4 pinches salt and pepper
4 teaspoons pine nuts, toasted (place in 350 degrees oven for five minutes and toast till golden brown-- or in a dry pan till they're browned)
4 teaspoons fresh thyme, chopped

Preparation

Heat oil in a sauté pan.
Add pancetta & sauté until golden brown and crispy.
Add sweet potatoes, asparagus, chicken stock and risotto.
Stir to combine and cook risotto.
Add chicken, butter, Reggiano or Parmesan and salt and pepper.
Stir to mix.
Place on a serving plate and garnish with pine nuts and thyme.
Serves 4 (large portions)
Roasted sweet potatoes
Dice 2 sweet potatoes, mix with salt and pepper and olive oil to coat. Place in a 350 degree oven for 35 minutes and cook until slight browning occurs.
Risotto
Ingredients
1 quart chicken stock
2 cups water
1 tablespoon extra-virgin olive oil
1 small onion, chopped
2 cloves garlic, finely chopped or grated
1 cup Arborio rice
½ cup white wine
2 tablespoons butter, cut into small pieces
Preparation
In a large pot, heat the stock and 2 cups water over medium low heat.
In a risotto pot or large skillet with a rounded bottom, heat the extra-virgin olive oil over medium to medium-high heat.
Add the onions and garlic to pan and saute to soften 3 to 4 minutes.
Stir in the rice and heat the rice for one to two minutes, then add the wine and cook until evaporated.
Add in the hot stock a few ladles at a time and stir for a minute with each addition to develop the starch and the creamy aspect. Total cooking time will be about 18 minutes or so. Keep adding stock each time the pan starts to become dry at the edges.
When rice is cooked to al dente, stir in the butter and cheese. Season with salt and pepper, to taste and transfer to a sheet pan and cool.

Garden Success

I have had my first garden success! I recently planted 6 pansies in the back yard (all of which are still alive, yea!) and with the empty container I filled it and planted 6 tomato starters inside. As of today, three have started to bud out of the soil! This proves that I am not a complete plant killer. I also planted some outside directly in the ground, but none have come up yet. Fingers crossed that they will...


Monday, April 16, 2012

Gardening diary

Since moving I have acquired a small patch of dirt in my back yard. I have decided to man the land and make something  grow. I feel completely out of my comfort zone since I have never managed to keep a plant alive for more than a couple of weeks, but I will share my success/failures in an attempt to help others who may feel lacking or lost in this area. I figured the best place to start was to clear out the weeds and prepare the ground with some soil/feed stuff. My mother agreed. Here are my first efforts.
 From the corner to the left will be flowers.
This whole section will be vegetables and herbs.

Nothing too exciting yet. I did plant a flower but it is not in photo condition yet. We will get there.

Friday, April 13, 2012

Easy Chicken Cordon Bleu

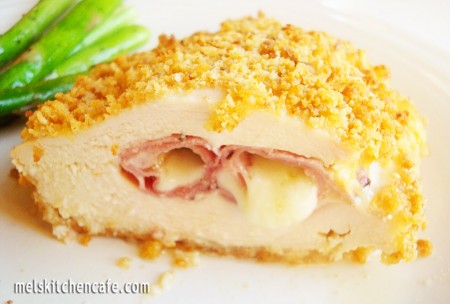
Post-Easter left us with a lot of extra ham, therefore I thought it would be yummy to take another stab at making chicken cordon bleu. My first attempt, hardly worth blogging, turned out just okay. So, after much research I used some of the tips mentioned in this blog to make a better dish. One of the best tips is to have absolutely everything prepped and ready to go so that the assembly line goes smoothly.

Ingredients
4 large boneless skinless chicken breasts
4-8 slices of ham (depending on the size of the meat. Mine was freshly cut from the deli and was huge so I only used 4 pieces).
4 slices of swiss cheese (the lady in the aforementioned blog used shredded, whatever works).
Salt & Pepper
olive oil
 toothpicks, if necessary

1 1/2 cups Italian seasoned bread crumbs
2 TBS butter, melted

1 egg
2 TBS dijon mustard

Preheat oven to 350

Beat your egg, dijon mustard, and a splash of water together in a shallow dish. Set aside. Mix the melted butter into your bread crumbs. They will clump up, but if you continue to work your fork through the crumbs they will separate back out. The butter will help your crumbs to get nice and crunchy.

For the chicken, you will want to first roll up your ham and cheese into nice little rolls. Then, cut pockets in your chicken large enough to fit the ham/cheese rolls. I put my fingers on top of the chicken to act as a guide to make sure I didn't cut all the way through.Salt and pepper your chicken breasts, then stuff in your ham and cheese rolls. If you press together the open edge, it should reseal. If it doesn't, you can always use a toothpick to keep the chicken sealed together.

Dip each breast into the egg wash, making sure both sides are evenly covered. Then transfer your breast to the bread crumbs and evenly coat both sides.

Place them on a greased cookie sheet, and drizzle them lightly (like just a few drops on each) with your olive oil. Bake for 20-25 min. 

Here is the link again, but this is what your ham rolls should look like inside your chicken. She was able to fit 2 rolls per breast, but due to the size of mine I only fit one.


Monday, March 19, 2012

Sunday Comfort: coq au vin

Yesterday was a cloudy, snowy Sunday and that means that we needed some yummy comfort food. This meal is particularly meant for a special occasion or for once in a while.The reason I say that is this is not the type of recipe where you happen to have all of the ingredients lying around. I used the recipe from Ina Garten and my modifications are in parentheses.

Coq Au Vin (in other words, yummy French stew)

Ingredients

  • 4 ounces good bacon or pancetta, diced ( I used bacon)
  • 1 (3 to 4-pound) chicken, cut in 8ths (Seeings how I'm pregnant again, I was not about to butcher in anyway a chicken. I bought drumsticks, breast, and thighs separately and froze what I didn't use. I also trimmed the skin and fat from the thighs since they are such a fatty cut.)
  • Kosher salt and freshly ground black pepper
  • 1/2 pound carrots, cut diagonally in 1-inch pieces
  • 1 yellow onion, sliced (I omitted this completely)
  • 1 teaspoon chopped garlic (also sold conveniently in pre-chopped squeeze tubes :) )
  • 1/4 cup Cognac or good brandy (I omitted this completely--it wasn't worth the purchase)
  • 1/2 bottle (375 ml) good dry red wine such as Burgundy (I used a Cabernet Sauvignon 375mL= 1 1/2 cups. We have used both wines and honestly I couldn't tell a difference. I'm no wine connoisseur. Also, if you're like me you don't have a corkscrew at home. Luckily wine comes with twist-off tops)
  • 1 cup good chicken stock, preferably homemade (I used it from a can, homemade is way too involved for me)
  • 10 fresh thyme sprigs (I used an italian blend of thyme and oregano for a little more depth, about 1 tablespoon)
  • 2 tablespoons unsalted butter, at room temperature, divided
  • 1 1/2 tablespoons all-purpose flour
  • 1/2 pound frozen small whole onions (I could not find them frozen so I had to buy them fresh and the bag was larger than 1/2 lb, hence the reason I omitted the yellow onion.)
  • 1/2 pound cremini mushrooms, stems removed and thickly sliced (no creminis where I shopped, so I used baby bellas--still just as good).
Preheat the oven to 250 degrees F.

Heat the olive oil in a large Dutch oven. Add the bacon and cook over medium heat for 8 to 10 minutes, until lightly browned. Remove the bacon to a plate with a slotted spoon.


Meanwhile, lay the chicken out on paper towels and pat dry. Liberally sprinkle the chicken on both sides with salt and pepper. When the bacon is removed, brown the chicken pieces in batches in a single layer for about 5 minutes, turning to brown evenly. Remove the chicken to the plate with the bacon and continue to brown until all the chicken is done. Set aside.

Add the carrots, onions (here I put in the pearl onions since they were fresh. I didn't want al dente onions as this recipe calls for the pearls at the end), 2 teaspoons salt, and 1 teaspoon pepper to the pan and cook over medium heat for 10 to 12 minutes, stirring occasionally, until the onions are lightly browned. Add the garlic and cook for 1 more minute. Add the Cognac and put the bacon, chicken, and any juices that collected on the plate into the pot. Add the wine, chicken stock, and thyme and bring to a simmer. Cover the pot with a tight fitting lid and place in the oven for 30 to 40 minutes, until the chicken is just not pink. Remove from the oven and place on top of the stove.


Mash 1 tablespoon of butter and the flour together and stir into the stew. Add the frozen onions (I did this much earlier to ensure they were fully cooked). In a medium saute pan, add the remaining 1 tablespoon of butter and cook the mushrooms over medium-low heat for 5 to 10 minutes, until browned. Add to the stew. Bring the stew to a simmer and cook for another 10 minutes. Season to taste. Serve hot.

My notes: depending on how much your chicken cooked in the browning process depends on how long you need yours to stay in the oven. Because I bought mine all separately, the pieces were smaller and so they cooked much faster. I did not have to leave it in as long. 

If you get stuck buying fresh pearl onions, a quick tip to peeling them is to boil a pot of water, dump in the onions and let them boil for about a minute, then remove them. The onions skins will come off super easy this way and you don't have to worry about peeling a bajillion onions.

Remember to get wine with a twist-off top if you don't have a wine key/cork screw. Nothing is worse than getting home and not being able to open the wine, or having to knife away at the cork until it disintegrates or falls inward to the wine.

 Browning the bacon. As you can see I did not use a dutch oven-- this is an oven-safe pot and it worked great!
 Diagonal cuts. I used baby carrots, mostly because they are easier to eat than big ol' chunks of regular carrot.
 Post-boiled onion: you can see the skins peeling right off. I chopped the ends and it was easy to get them peeled.
 Browning the chicken. I recommend rotating the chicken in terms of placement because if your oven/coil is like mine, all of the fat sat at the bottom and cooked whatever was down there a lot quicker than what was at the top.
 Sauteeing the carrots and onions. I did chop some of the pearls so that they would spread more of their flavor since I omitted the yellow onion.
 Added the chicken back in with the vegetables, as well as the stock and wine. This is pre-oven.
 This is post-oven. The chicken will get a dark exterior from the wine, but the inside stays nice and white and juicy!
 Sauteeing the mushrooms. This is the first time I used baby bellas and they are kind of a sensitive mushroom, meaning they bruised easily.
 All together in the pot.
Served atop mashed potatoes--enjoy!

Thursday, January 19, 2012

COMING SOON!!

You didn't know we were taking a break, did you? Neither did we. Needless to say, between Rachel's baby and my cross-country-move/family tragedy/christmas/working 500 hours a week, this blog has been sadly neglected!

Today at work (whre it is painfully slow (I've been here 4 1/2 hours and the phone has rung ONCE) I decided what I am going to make for me to eat next week. (I cook a big meal or two once a week, then freeze in tupperware. Then I pull out a tupperware when I leave home at 8:30ish and by 6:30 it's thawed and ready to be popped in the microwave and eaten at my desk) This serves 2 purposes, it fills my cooking urges (which have a tendancy to DIE on my way home at 8:00 pm), and saves me from eating out which is bad for the budget and for the waistline. It also keeps me happy, as my quota a for mac-n-cheese has been already filled this quarter (and by quota I mean ONCE, I've had it once).

So, here are the meals I'll be making Today and tomorrow, This way I'll be accountable for taking pictures AND for posting them (I have pictures of some stuff that I just haven't managed to get up here in all the disastratastraphy! (yes, it is a real word).

Pizza: I know, you're wondering how it will freeze, Honestly, I'm wondering too! We'll find out, but let me tell you-- this is THE BEST pizza dough recipe I've ever had. And I'm planning on some BBQ chicken as well as some 'trash' pizza. I think they'll be pretty small, and wrapped in saran wrap then foil... I think...

PF Changs Lettuce Wraps. (I made another lettuce wraps recipe over christmas, but I want to try this one... since PF Changs' lettuce wraps are amazing) (I'll probably actually just make it a salad, as lettuce wraps are messy-- and that should work, right? small containers of the filling ready to heat up and toss on a bed of greens.

Char Sui Bao: What? what?  I know... it's a foreign language. These are delicious Chinese buns with BBQ pork filling. YUM, right? Again... I tried once recipe over Christmas, and I'm going to try a different one this time, to see if I can get it right. Also, this one doesn't require 1/2 cup of red food coloring... (ok the other one just called for 1/4 tsp of the GEL... hello red dye #40!)

Anyway-- be excited, because I am... also because I found pork loin chops for 1.18/lb. I LOVE Provo food prices :)

Also, theoretically coming soon-- awesome melty crayon art inspired by pinterest... we'll see if my hairdryer is good for anything besides making my hair awesome (with help from the moisture sucking place that is the Utah desert).